(Version 1.0)
Mikrotik devices are wonderful networking tools. They offer flexibility and cost empowerment to solve networking problems. But, the way we deploy Mikrotiks in the industry is creating multiple security risks. People are not spending the time to secure Mikrotik devices.
- Organizations deploying Mikrotik devices are creating security risks inside their organization.
- ISPs who are not tracking the Mikrotik deployments on their customers are creating a risk for their business, network, and other customers.
- The Industry who are not pushing for better “out of the box” Mikrotic security is accepting massive DDoS attack, gateways for ransomware crews, and a range of other abuse.
It cannot be ignored that Mikrotik devices are 2022’s most dangerous malware platform. We hope this work will help engineers, administrators, and organizations seek out, secure, and clean up the Mikrotik devices in their network.
Step-by-Step Guide for Securing your Mikrotik Device
First, with any network device, there are core principles that lead to security and resiliency. These are general principles that we will point out in this guide. They are applied to any network vendor.
Second, we will present several deployment scenarios. In this scenario, we are working to secure a basic Mikrotik router connected to the Internet (see the figure).
Lastly, if you go through these steps and find problems, ASSUME YOUR ROUTER IS COMPROMISED! At the end of this process, you will need to do a NETINSTALL, rebuild the Mikrotik device, and start from scratch.
WHY?
The modern compromises to Mikrotik devices can get into the underlying Linux operating system. These RouterOS remediation steps cannot fix problems inserted into the device’s Linux. It must be rebuilt.

Step 0 – Assume your Mikrotik is infected, owned, and controlled by a Miscreant.
The number of exposed, vulnerable, and known Mikrotik devices is in the millions. Given this, it is best to assume that your device is controlled by a miscreant using your device for criminal activities. Criminal activities that put your network at risk.
Through this guide, we will continuously assume the Mikrotik device is compromised. Each step allows us to build confidence in the configuration and the deployment.

Step 1 – Backup Your Device
Yes! The first step is to back up your Mikrotik device and copy the backup to a safe location. This action is common sense before making any changes to a device or the network.
Mikrotik’s new BACKUP documentation provides details. (https://help.mikrotik.com/docs/display/ROS/Backup)
Don’t depend on the Mikrotik Cloud Backup!
Since RouterOS v6.44 it is possible to securely store your device’s backup file on MikroTik’s Cloud servers; read more about this feature on the Mikrotik IP/Cloud page. But what happens if you cannot get to the cloud backup? It is common sense to have a local backup location along with the convenience of a cloud backup. Do both.
Step 2 – Upgrade Mikrotik’s Winbox
Ease of use is one of the core reasons why there are so many Mikrotiks deployed. People do not need to be network experts to get value. Mikrotik’s Winbox application is one of the key reasons. Winbox is a small utility that allows the administration of MikroTik RouterOS using a fast and simple GUI. It is a native Win32 binary but can be run on Linux and macOS (OSX) using Wine. All Winbox interface functions are as close as possible, mirroring the console functions, which is why there are no Winbox sections in the manual.
Winbox loader can be downloaded from the MikroTik download page.
You now have confidence that you have the latest version of Winbox deployed on your network.
Step 3 – Upgrade RouterOS
Moving to an updated version of the RouterOS software is the first step. It is not a “security fix” but a critical security step.
Mikrotik’s Upgrading and Installation documentation provides details on how to upgrade. Upgrading to the latest stable version of Router OS software is recommended.
Step 4 – Username and Passwords
Mikrotik out-of-the-box has a default username of “admin” and NO PASSWORD! Yes, this contradicts the industry’s best common practices (BCPs). It exposes your brand new Mikrotik device to miscreants constantly scanning the Internet looking for new devices that have yet to change the default username and add a password. Mikrotik’s documentation has you connecting the device to the network with no security, then says ….
“Now anyone worldwide can access our router, so it is the best time to protect it from intruders and basic attacks.”
Just assume the miscreants have your Mikrotik username and password. Change your username and password!
Mikrotik’s Protecting the Router documentation has details to change the password. Here is a practical workflow:
- Change the Password of the user “admin” on the device. Remember the new password.
- Add new users to maintain the router. These new users would replace the “admin” user.
- Test the new username and passwords to ensure you have access. Have a separate username/password for your Winbox access.
- Test the Winbox configuration to ensure it works with the new usernames/passwords.
- Delete the user “admin.”

Test your Passwords to see if compromised
The Have I been PWND site is a public service that allows people to check their usernames, emails, and passwords. Testing any new password on Have I been PWND is prudent, validating the exposure.
https://haveibeenpwned.com/

Step 5 – Limit the Source IP Blocks to Connect to the Router
The world does not need to connect to your router. The world should not be telneting or trying to use Winbox from all over the world. Limit the IP Source address used for the username and the most critical services.
- Restrict username access for the specific IP address. In this example, we’re using the network from the illustration 192.168.2.0/24
/user set 0 allowed-address=192.168.2.0/24
- Restrict Winbox service access to be only from a specific subnet:
/ip service set winbox address=192.168.2.0/24

Step 6 – Change the port # for SSH
Changing the SSH port number is a trick to minimize brute-force password hacking on your router. Change and test the port before turning off the telnet service on the router!
The port number for SSH is 22 by default. Here, we change the default SSH port number from 22 to 2200. This will make it harder for miscreants’ “scanning tools” to find your SSH port and “brute force” password guessing.
/ip service set ssh port=2200
Test the SSH connection! Ensure you can SSH to the new port (2200 in this example).

Step 7 – Limit the Services Opened on the Router
Once you know SSH works on the new port, you can turn off the Telnet Service:
/ip service print
/ip service disable telnet
/ip service print
Don’t stop by turning off telnet. There is a range of services that Mikrotik turns on that are not needed.
The Best Common Practice (BCP) for security on network devices is to turn off everything! Then turn on specific functions/services as part of your network design. Minimize RISK by minimizing what is running in the background on your network device.
Start with disabling these services:
/ip service print
/ip service disable telnet,ftp,www,api,api-ssl
/ip service print
A bandwidth server is used to test throughput between two MikroTik routers. Disable it in the production environment. This can be used as a DDoS tool.
/tool bandwidth-server set enabled=no
Don’t let the router be a DNS DDoS Reflector. DNS cache might be configured on the router, which turns it into a DDoS Reflector. Make sure it it turned off.
/ip dns set allow-remote-requests=no
If you need the DNS Cache to have the router, explicitly set up the DNS function to restrict who can use the Mikrotik router for DNS traffic (i.e. only inside your network).
Step 8 – Turn off Direct Access via the MAC Address
By default, the mac server runs on all interfaces. That means anyone directly connected to the Mikrotik device can connect or telnet to the device. This allows miscreants inside the network to connect back to the device.
The Mikrotik MAC Connectivity Access provides details to disable MAC Connectivity by default on all entries and then add a local interface to disallow MAC connectivity from the WAN port.
https://help.mikrotik.com/docs/display/ROS/First+Time+Configuration#FirstTimeConfiguration-ProtectingtheRouter

Step 9 – Turn off Neighbor Discovery Protocol
Mikrotik provides an up-to-date neighbor discovery service that includes the MNDP (MikroTik Neighbor Discovery Protocol), CDP (Cisco Discovery Protocol), and LLDP (Link Layer Discovery Protocol) in the Layer2 broadcast domain. It can be used to map out your network.
Miscreants, malware, and APT (advanced persistent threat actors) already inside your network can use Network Discover Protocol to map out your network.
The Best Common Practice (BCP) is to turn off Network Discovery by default. Mikrotik turns network discover ON by default. So it needs to be manually turned off:
To disable neighbor discovery on all interfaces:
/ip neighbor discovery-settings set discover-interface-list=none

Step 10 – Limit WHO on the Internet Can Access Your Mikrotik!
Limit which services can access the router on the Internet-facing “public interfaces” (see illustration). This is done with Mikrotik’s Firewall Service.
There are core access list/firewall filter principles for how you protect your router, network, services, and your organization. Protecting Routers, Switches, and Network Devices is a good video tutorial on YouTube that walks through these principles. In this example, IP connectivity on the public interface must be limited by the Mikrotik firewall feature. In this example, we will accept only ICMP(ping/traceroute), IP Winbox, and ssh access.
/ip firewall filter
add chain=input connection-state=established,related action=accept comment="accept established,related";
add chain=input connection-state=invalid action=drop;
add chain=input in-interface=ether1 protocol=icmp action=accept comment="allow ICMP";
add chain=input in-interface=ether1 protocol=tcp port=8291 action=accept comment="allow Winbox";
add chain=input in-interface=ether1 protocol=tcp port=22 action=accept comment="allow SSH";
add chain=input in-interface=ether1 action=drop comment="block everything else";
Mikrotik Firewall References
The is a mix of guidelines and references. Here are some to explore when building your firewall access rules to protect your router, network, and organization.
- Mikrortik’s Orginal Security Recommendations – Manual: Securing Your Router – this has someone good examples that did not get carried over to Mikrotik’s new Confluence-based wiki. Look in the “firewall” section.
- Mikrotik’s Documentation: First Time Configuration – this has a section on firewalls.
- Unimus Guide: Validating the security of your MikroTik routers network-wide

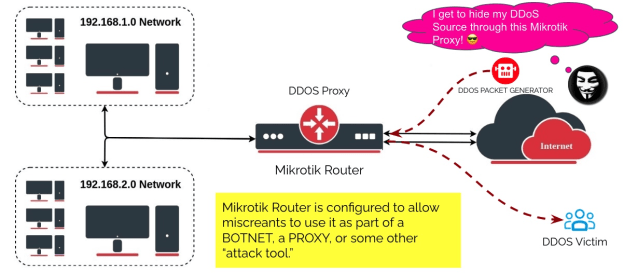
Step 11 – Don’t let your Mikrotik be used as a “DDoS Proxy!”
Mikrotik’s proxy, socks, UPnP, and other services are getting turned ON “accidentally,” turning the Mikrotik into a powerful DDoS Weapon. These features, combined with other Mikrotik capabilities, turn the device into a “bot” that becomes a member of the threat actor’s BOTNET.
DO NOT LET MISCREANTS USE YOUR MIKROTIK DEVICE FOR CRIMINAL ACTIVITY!
Mikrotik disables these by default. Check if they are turned on and manually turn them off – to be sure:
- MikroTik caching proxy
/ip proxy set enabled=no
- MikroTik socks proxy
/ip socks set enabled=no
- MikroTik UPNP service
ip upnp set enabled=no
- MikroTik dynamic name service or IP cloud
/ip cloud set ddns-enabled=no update-time=no
Step 12 – Start Cleaning Up Your “Compromised” Router
At this point, it is time to see if your Mikrotik device has been compromised. As you can see in this Mikrotik blog post – MĒRIS BOTNET – Mikrotik devices are sought after by threat actors and miscreants. As mentioned in the beginning, we are making the assumption your device has been compromised.
- Check the Mikrotik Scheduler. The threat actor will install a rule that executes the script. Those scripts are evolving and creative. Check every scheduled script (under System → Scheduler). If you don’t know the script, download a copy, then delete it. Look for scripts with the fetch () method.
- Check Files on the Mikrotik Router – Delete Unknown Files. Check the files on your Mikrotik. If you do not recognize it, download a copy, then delete the file.
- Check the SOCKS Proxy. We covered this earlier, but it is worth checking again. An unknown SOCKS proxy server enabled on your router indicates that the router has been compromised.. You’ll find the setting under IP → SOCKS; if you do not use it, disable it;
- Check for L2TP Clients. Threat Actors will use L2TP to control the router as part of a BOTNET. Look for any L2TP clients called lvpn, (or any other L2TP client unfamiliar to you). Delete these clients.
- Check all the Firewall Rules! A threat actor will “open a hole” in the firewall to allow them to get remote access. For example, a firewall rule that allows remote access through port 5678 was used as part of the early versions of the MĒRIS botnet. Remove this rule, then check each firewall rule.
There is more. Unimus created a guide with more detailed scripts to help recover a compromised Mikrotik device (see Validating the security of your MikroTik routers network-wide).
Step 13 – Prevent Trickbot from using Your Router
Trickbot is a modular trojan that’s been around since 2016 and is often used by cybercriminals to deliver ransomware or other malware. The miscreants using Trickbot have found they can use Mikrotik Routers as “proxies” to hide their Trickbot Command and Control.

The Microsoft Defender for IoT Research Team (Section 52) published details of how Trickbot exploits Mikrotik in Uncovering Trickbot’s use of IoT devices in command-and-control infrastructure. They also have an open-source tool to help check Mikrotik devices (see routeros-scanner on Github).
The Trickbot “miscreant threat actors” are using the same approach we are working to prevent in the previous defensive steps:
- Trickbot crews are using default MikroTik passwords where the device has been plugged in before being securely configured.
- Trickbot crews scan for Mikrotik devices, then launch brute force “password guessing” attacks. Microsoft has seen attackers use some unique passwords that probably were harvested from other MikroTik devices.
- Trickbot crews are exploiting CVE-2018-14847 on devices with RouterOS versions older than 6.42. This vulnerability gives the attacker the ability to read arbitrary files like user.dat, which contain passwords.
Microsoft’s Section 52 Team we able to explore Mikrotik confirmation commands to unravel the Trickbot crew’s source and intent. For example, we observed attackers issuing the following commands:
/ip firewall nat add chain=dstnat proto=tcp dst-port=449 to-port=80 action=dst-nat to-addresses=dst-address=
From the command, we can understand the following:
- A new rule, similar to iptables, is created.
- The rule redirects traffic from the device to a server
- The redirected traffic is received from port 449 and redirected to port 80
The command looks like a legitimate network address translation (NAT) command that allows the NAT router to perform IP address rewriting. Here the Trickbot miscreants have compromised the Mikrotik router and configured the NAT for malicious activity. Trickbot’s Command and Control (C2C) is known for using ports 443 and 449.
How can you check if TrickBot’s Firewall Rule is installed?
Run the following command to detect if the NAT rule was applied to the device (completed by the tool as well):
/ip firewall nat print
If the following data exists; it might indicate a Trickbot infection:
chain=dstnat action=dst-nat to-addresses=
to-ports=80 protocol=tcp dst-address=dst-port=449
chain=srcnat action=masquerade src-address=
Run the following command to remove the potentially malicious NAT rule:
/ip firewall nat remove numbers=
Step FINAL – NETINSTALL and Start from Scratch
The final step is the reality check. There is no way to RouterOS commands can fix malware inserted into the device’s Linux operating system. This process helps to shape your troubleshooting, confirm if there is a compromise, and the process to configure Mikrotik to be secure.
Netinstall is a tool for installing and reinstalling MikroTik devices running RouterOS. Always try using Netinstall if you suspect your device is not working properly.
Tools to Check your Mikrotik Device
Severial companies have tool to help you track, check, and secure your Mikrotik devices.
Shadowserver’s Daily Network Report
Shadowserver provides any organization with IP addresses, Autonomous System Numbers (ASNs), or Domain Names with daily report based on their vast array of security telemetry. The Daily Network Reports are FREE and a Public Service to protect the Internet. Mikrotik devices that are exposed, vulnerable, or compromised are listed in the reports. Find out more about the Network Reports and How to Subscribe to the reports on wwww.shadowserver.org.
Meris RouterOS Checker
The Meris RouterOS Checker is a open source tool crafted by Eclypsium to help network admins check their Mikrotik devices.
https://github.com/eclypsium/mikrotik_meris_checker
Routeros-scanner
Microsoft crafted routeros-scanner as an open source tool to help organizations clean up Trickbot exploitations on their Mikrotik devices.
https://github.com/microsoft/routeros-scanner
RouterOS Security Research
Tenable is curating all their Mikrotik RouterOS security research on this RouterOS Security Research Github.
https://github.com/tenable/routeros.
What a Youtube Video – Securing Mikrotik Devices
There is a Youtube Playlist for a “how to secure your Mikrotik” device here: Mikrotik Router Security – How to keep control over your Mikrotik devices. It is good to watch and listen to many of your peers working to secure their devices. Taking action to protect your network is the most critical element!
- Mikrotik Tutorial no. 36 – 7 Things to do to Secure Mikrotik Router
- MikroTik RouterOS Securing Your Router and Good Security Practises
- Security analysis of recent RouterOS exploits
Are you looking for more practical, low-cost security Advice?
- You can sign up to the mailing list for updates here: Stay Connected with Senki’s Updates.
- Subscribe to Senki’s YOUTUBE Channel for videos on this and other security topics.
- Ask questions to Barry Greene – bgreene@senki.org
The materials and guides posted on www.senki.org here are designed to help organizations leverage the talent around them to get started with their security activities. Start with the Operator’s Security Toolkit and Meaningful Security Conversations with your Vendors. Each is no-nonsense security for all Operators. It provides details to help them build more security resilient networks. In the meantime, stay connected to the Senki Community to get updates on new empowerment and security insights.